Google Cloud
This section covers deploying Live Transcoder on Google Cloud Compute Engine instances.
Prerequisites
Please make sure that you meet all the following requirements for using Compute Engine in Google Cloud before continuing to the next page.
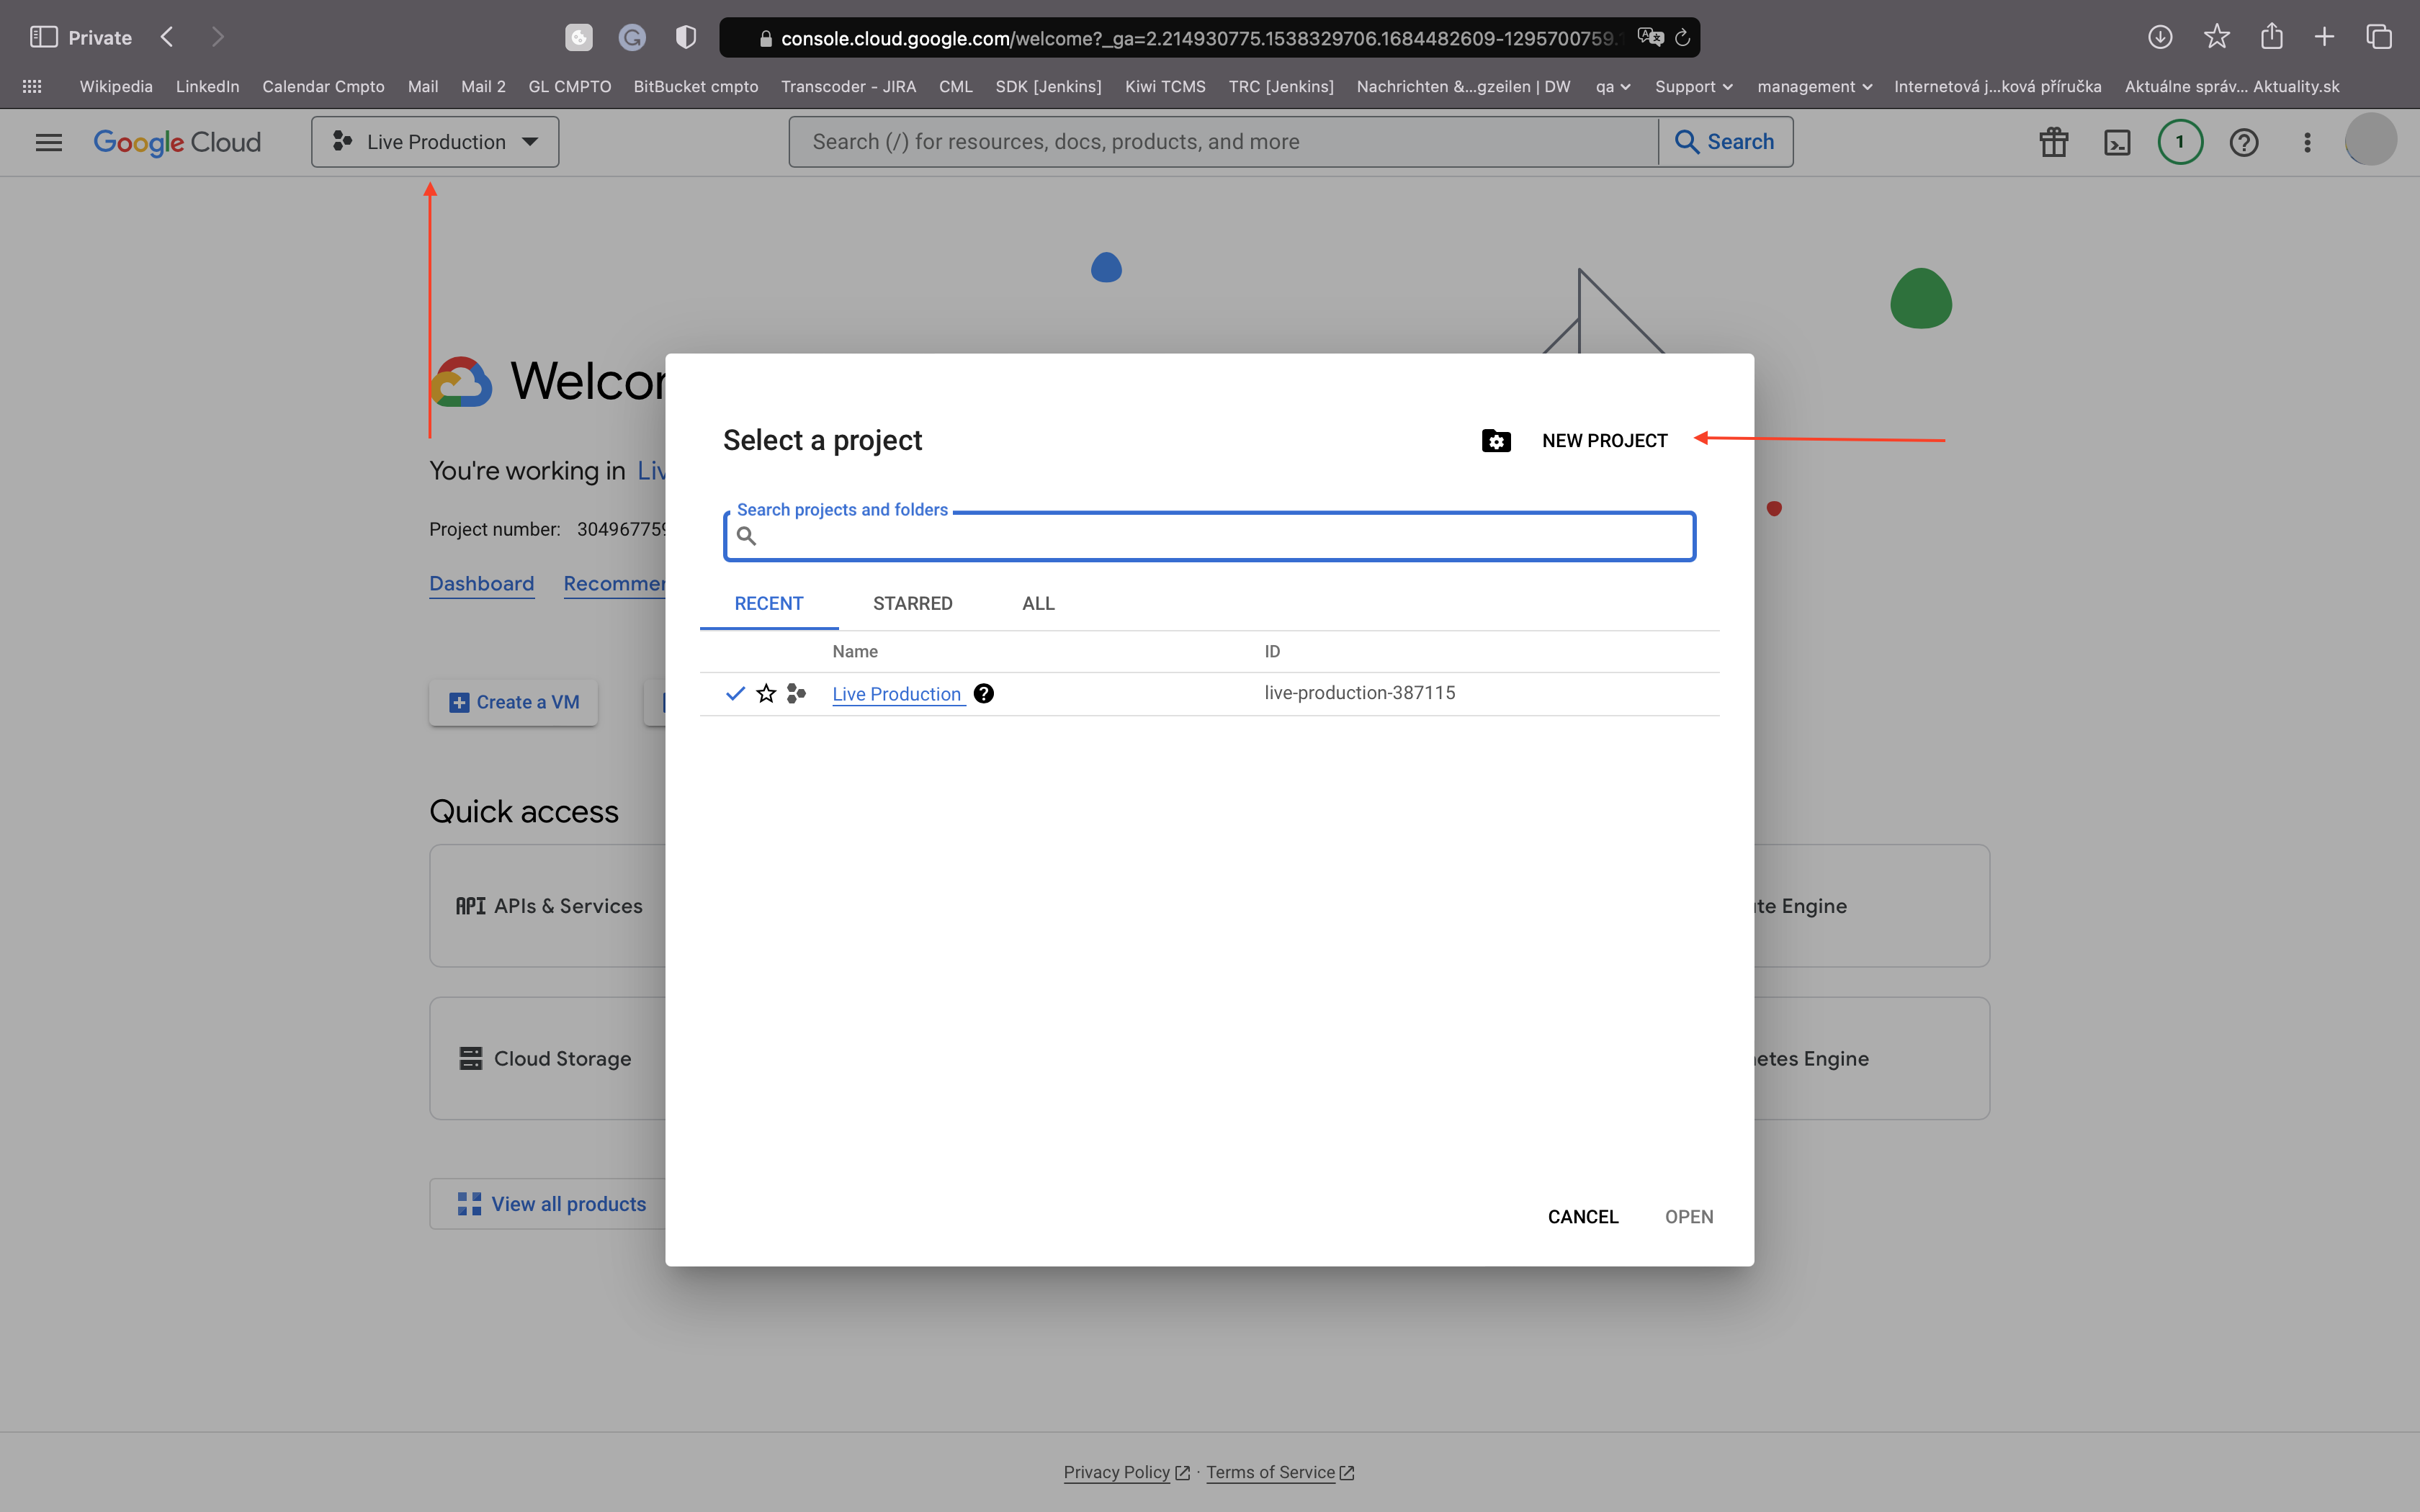
Creating a new Google Cloud project
- Visit cloud.google.com and sign in to your Google account
- Go to Console located in the top-right corner
- In the top-left corner is a drop-down menu to manage your projects. Click on it and create a new project
Enabling billing for a Google Cloud account
To enable billing in your project, please refer to the official Google Cloud docs.
Enabling the Compute Engine service
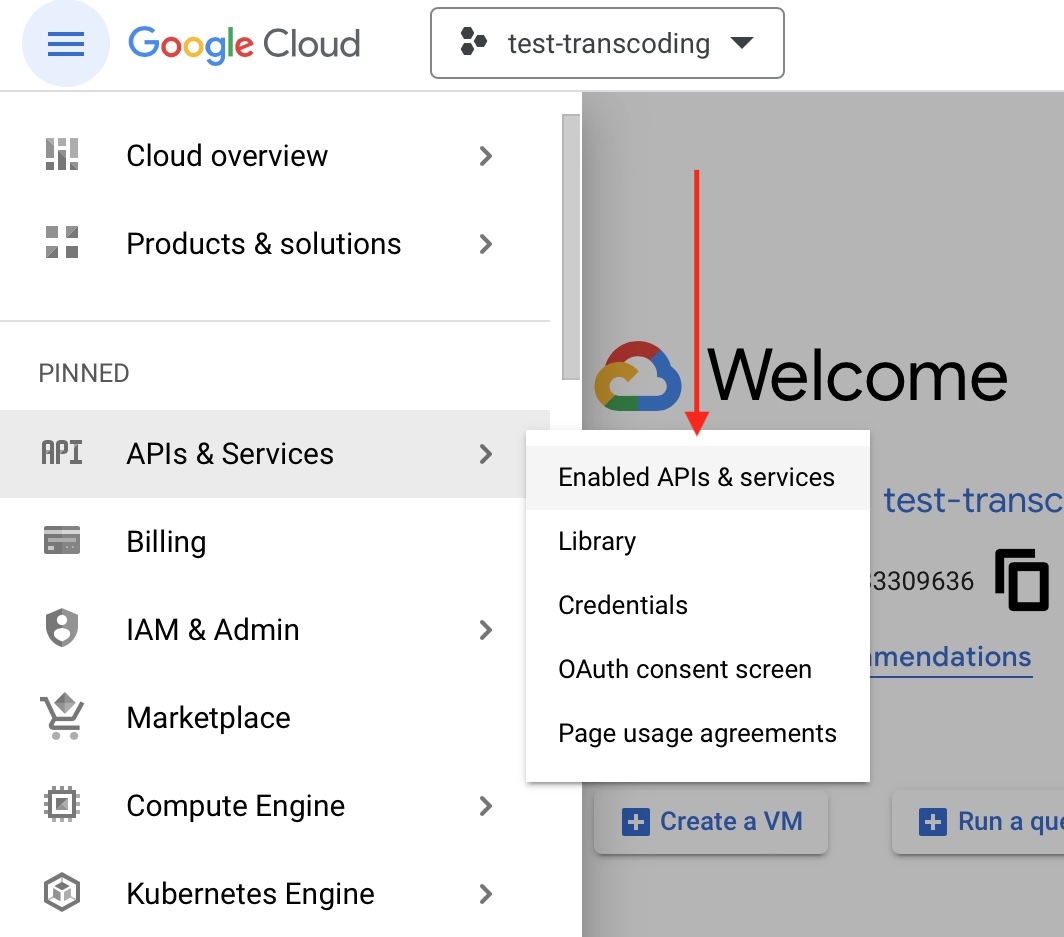
- On the dashboard, in the top-left corner, open-up menu
- Select APIs & Services and then Enabled APIs & services
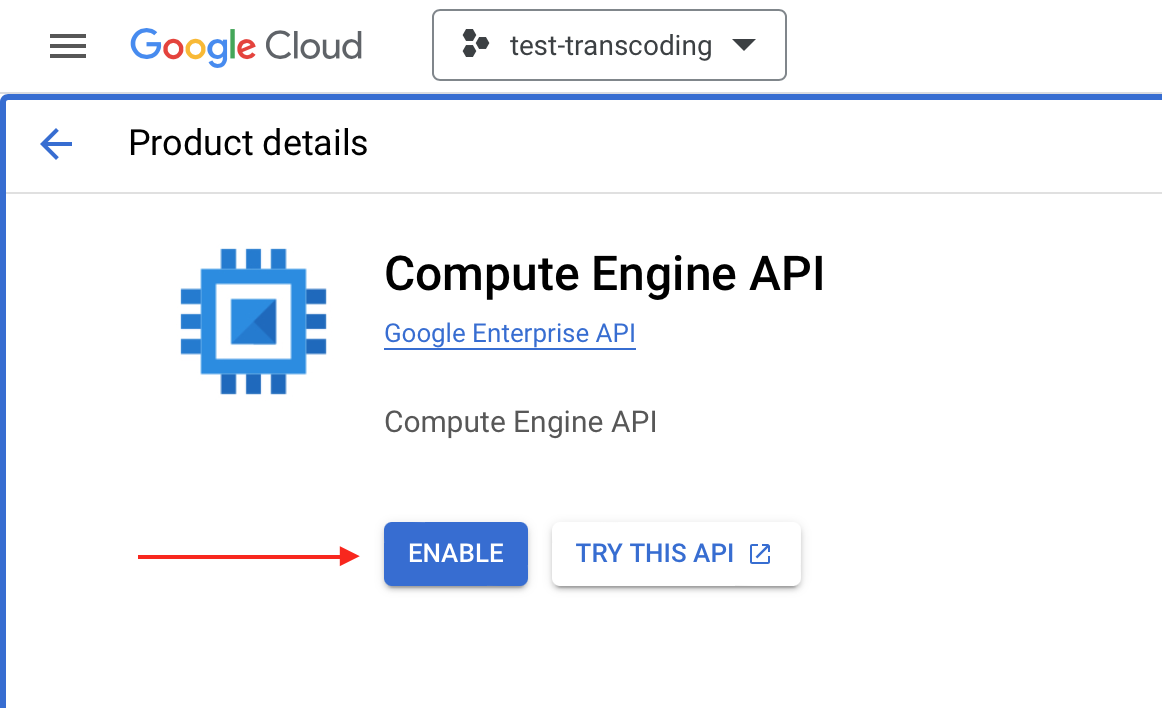
- Click on Enable APIs and services button

- And finally, find the Compute Engine service and enable it
Checking and requesting quotas
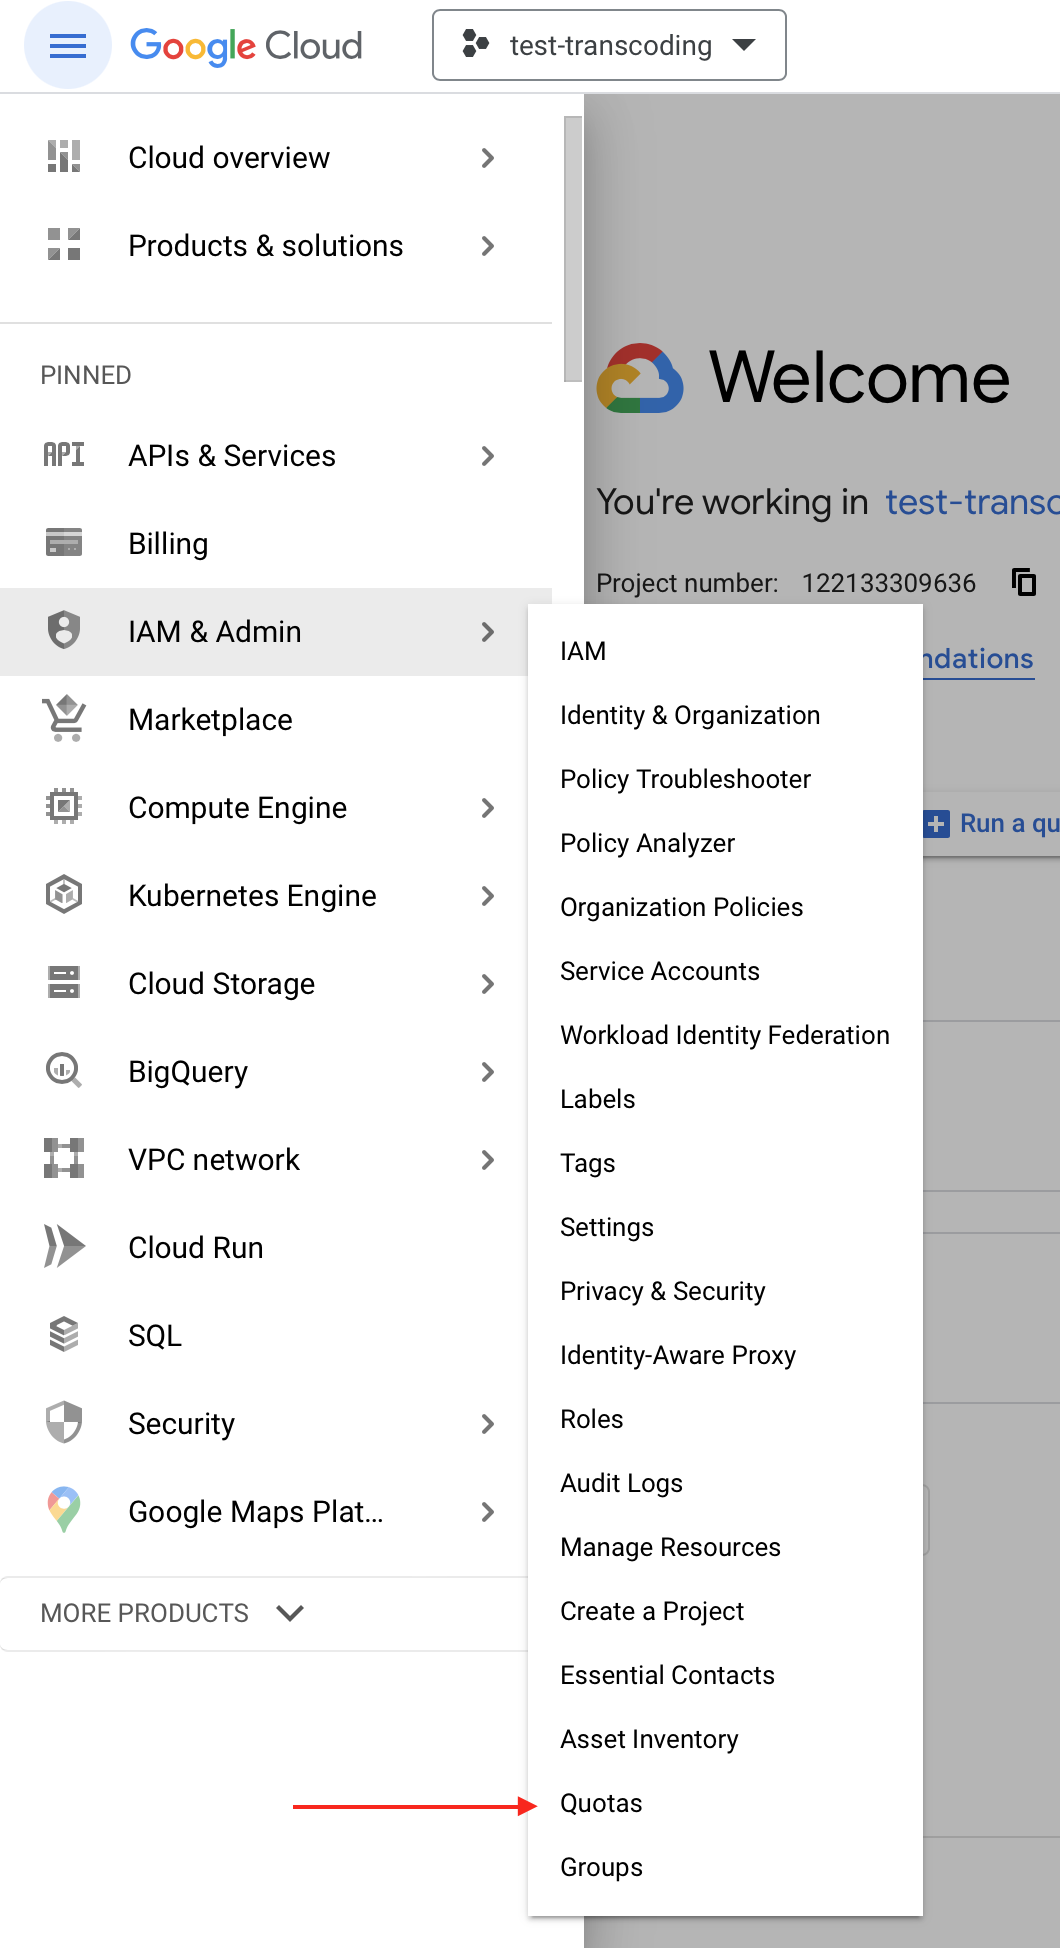
- On the dashboard, in the top-left corner, open-up menu
- Select IAM & Admin and then click on Quotas
- On the Quotas page, filter out Service: Compute Engine, then find your quota for GPUs and CPUs
- You may also filter out the region you'd like to set up the quota for
- Once the filter is set, select filtered items by their checkboxes and click on Edit Quotas
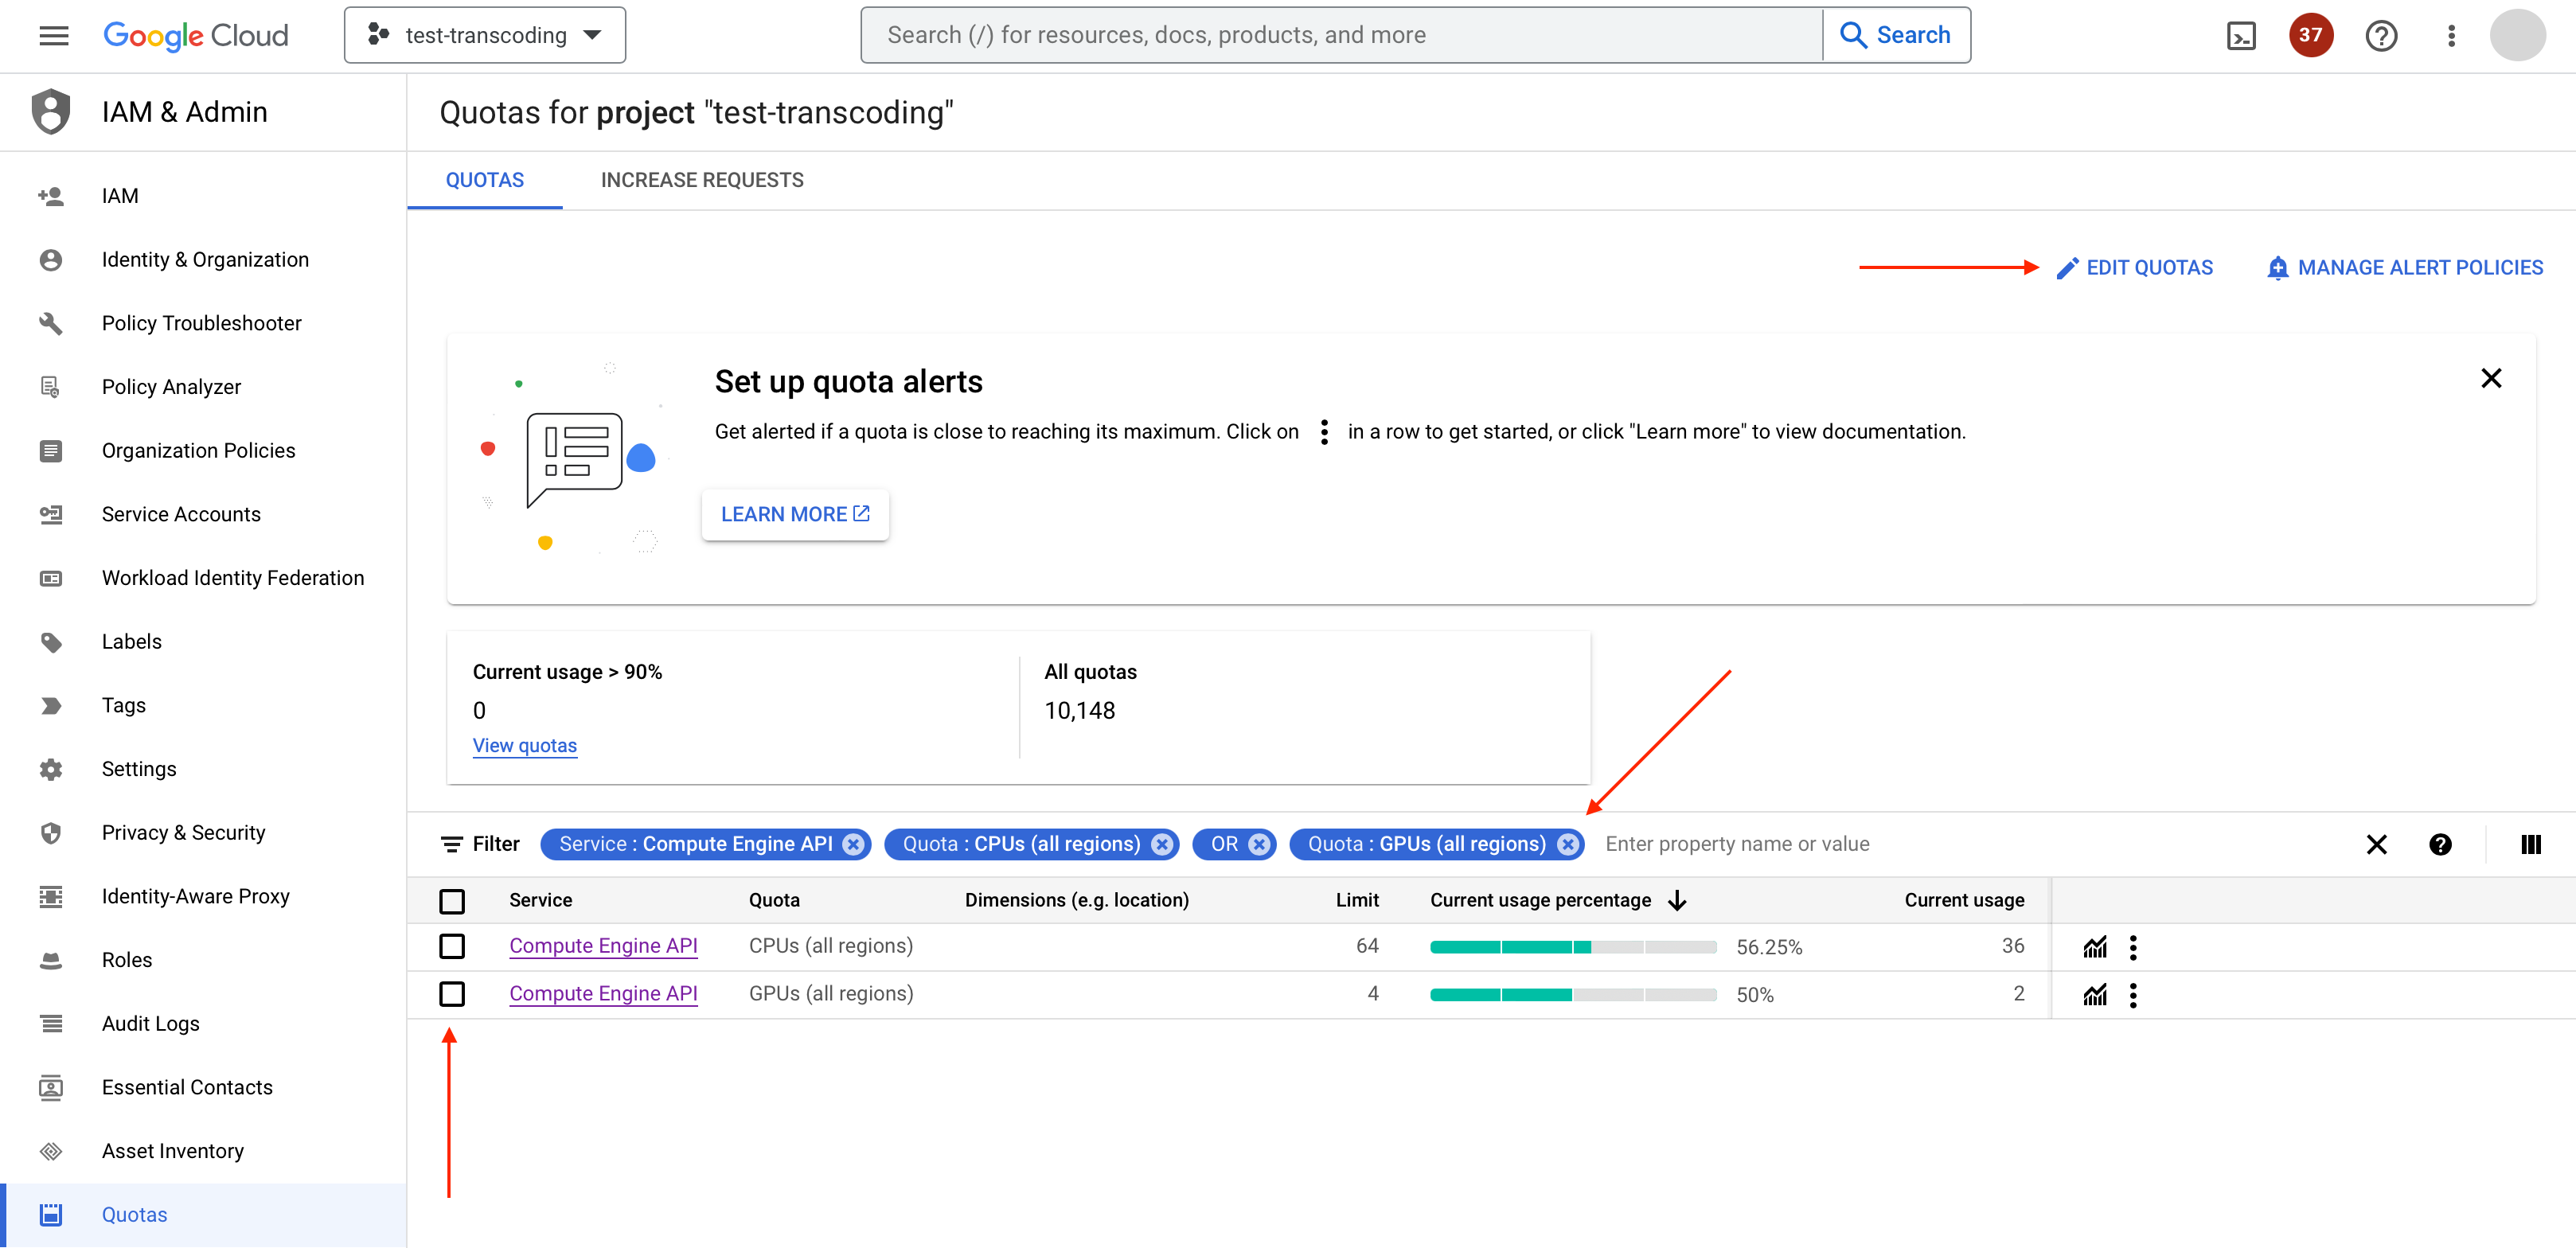
- In the popped-up dialog, specify the new limit for a particular quota and submit your request.
:::note Quota limits recommendation
Minimum:
- 4 vCPUs
- A single GPU
Note that you need at least 48 vCPUs to handle a single fully motion-compensated Framerate/Standards conversion stream at resolution 1920x1080 when converting from 50 FPS to 60 FPS or vice versa. :::
Launch host instance
Configuring the instance
Navigate from the Google Cloud dashboard to Compute Engine and find VM Instances.
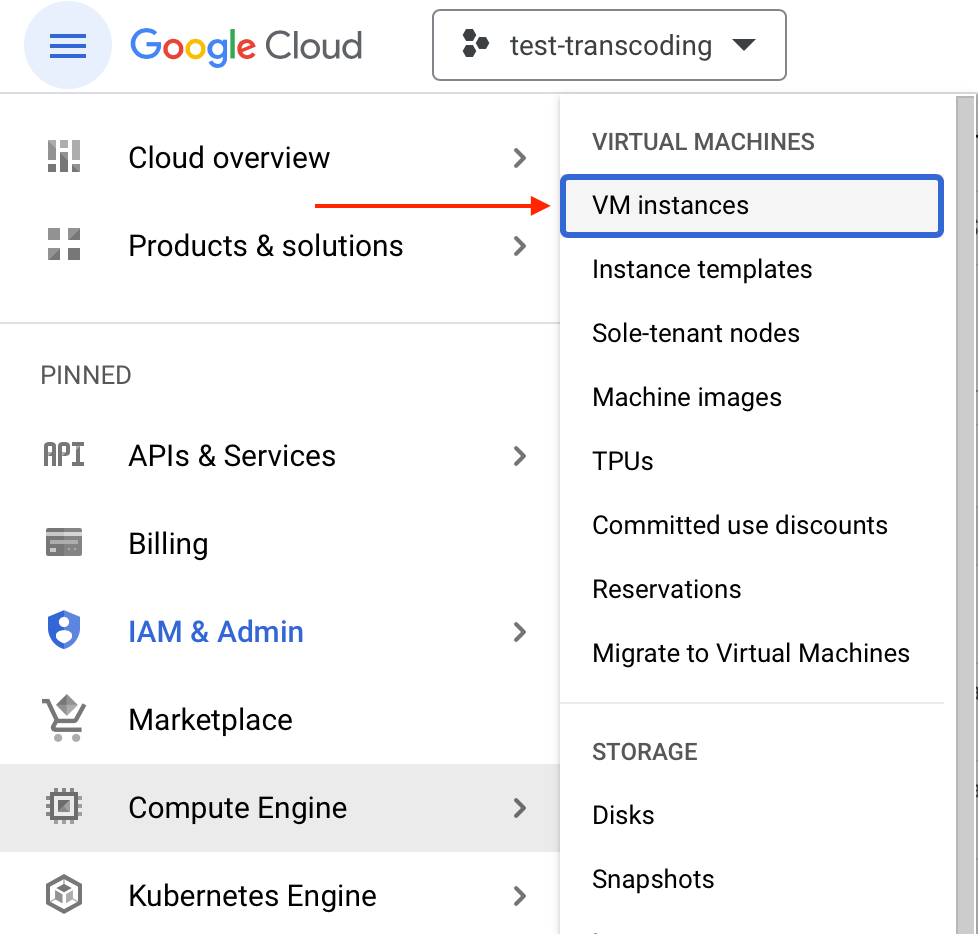
Click on Create instance button located at the top of the page.
Name and region
Specify the name of your instance and the designated region in which the instance should be hosted.
Machine configuration
GPU selection
In this section, switch the instance type from General purpose to GPUs. Then list from GPU type drop-down menu and select any of the listed GPUs.
CPU selection
You can list from available CPU + RAM combinations and select one or, preferably, switch to Custom to adjust the number of vCPUs and amount of RAM by yourself.
:::warning HW availability
- The availability of HW configurations is different across various regions. If your configuration is not available in the specified region, you will be notified and offered an alternative region.
- Always watch your quotas - the configuration page won't notify you whether the HW specs are within your quotas, e.g. it won't check whether you can create an instance with 64 vCPUs and four GPUs Tesla T4. HW specs and quotas are evaluated once you hit Create button. :::
:::note HW recommendation
We recommend starting your testing with the n1-standard-8 (8vCPU, 30GB memory) instance.
Still don't know what HW configuration is best suitable for you? Don't worry, our team will gladly help you out. Contact us at support@comprimato.com and describe your workflow for us. :::
Boot disk
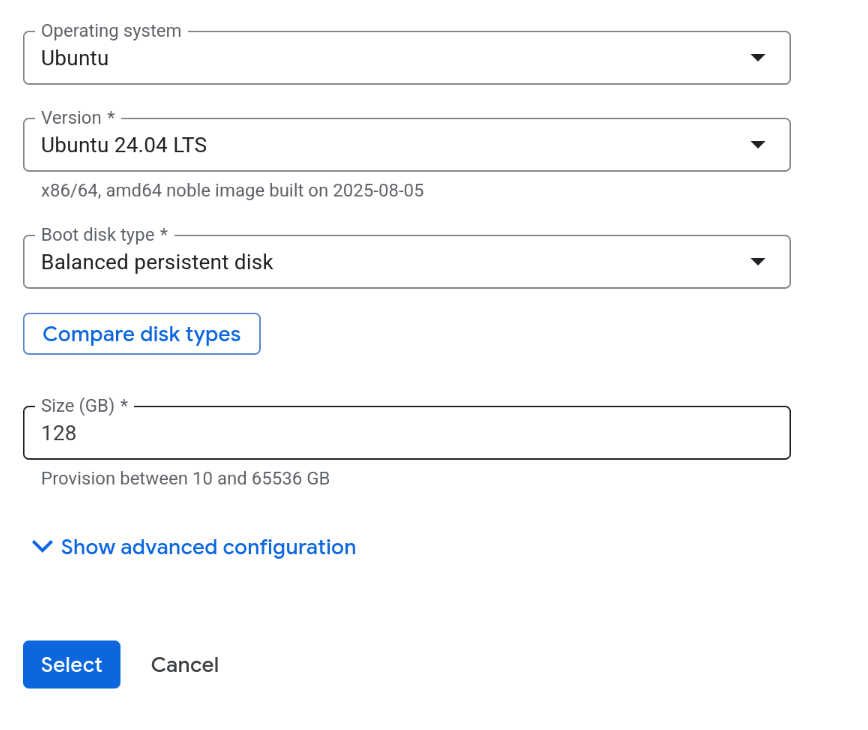
The recommended host OS for Live Transcoder is Ubuntu 24.04 LTS. You can select it by clicking on Change button in the Boot disk section.
For hourly-based streaming (less than 40 hours a month), the capacity of 128 GB will suffice. For HLS streaming (you can check our storage calculator) or more extended streaming periods, you should increase the storage size to at least 256 GB.
Make sure to check the Delete boot disk in Advanced configuration options so your quotas for disk space won't get filled up by deleted instances.
When using an instance with a smaller storage capacity, it is important to note that a significant portion of the free space is used for storing log messages in the journal. These log messages are crucial for diagnostics. Insufficient space for the journal can limit the ability to diagnose issues with the instance effectively.
To manage disk space efficiently, ensure you set the correct size for SystemKeepFree= and RuntimeKeepFree= in /etc/systemd/journald.conf.
Firewall
It is mandatory to allow HTTP traffic to be able to
- Access the GUI to the Live Transcoder
- Receive an HLS stream or host the HLS output
Allowing HTTPS is mandatory only if your HLS sources are on secured HTTP.
Advanced options
Networking
All the necessary networking/firewall rules are set for a particular network, usually labeled as default, before or after the instance is created. You will find an example of firewall rules later in the guide.
Management
Find the Automation section and paste the following script in it:
#!/bin/bash

## log file for nvidia-smi output executed in docker via NVIDIA container toolkit (NTC)
NTC_NVSMI_OUTPUT_FILE="nvidia-smi-docker.log"

## and log docker-compose version
DOCKER_COMPOSE_V="docker-compose-version.log"

## if these files exist, the system preparation has been performed
## do not continue if any of them exist (the preparation might have terminated abruptly)
if [ -f ${NTC_NVSMI_OUTPUT_FILE} ] || [ -f ${DOCKER_COMPOSE_V} ] ; then
	exit 0;
fi

## disable nouveau
sudo modprobe -r nouveau
echo "blacklist nouveau" | sudo tee /etc/modprobe.d/blacklist.conf

## update the system and install nvidia packages
sudo apt-get update -y
sudo apt install -y nvidia-headless-535 nvidia-utils-535 libnvidia-encode-535
sudo modprobe nvidia

## download and enable docker
curl https://get.docker.com | sh && sudo systemctl --now enable docker

## subscribe to NTC repo
curl -fsSL https://nvidia.github.io/libnvidia-container/gpgkey | sudo gpg --dearmor -o /usr/share/keyrings/nvidia-container-toolkit-keyring.gpg \
&& curl -s -L https://nvidia.github.io/libnvidia-container/stable/deb/nvidia-container-toolkit.list | \
sed 's#deb https://#deb [signed-by=/usr/share/keyrings/nvidia-container-toolkit-keyring.gpg] https://#g' | \
sudo tee /etc/apt/sources.list.d/nvidia-container-toolkit.list

sudo apt-get update

export NVIDIA_CONTAINER_TOOLKIT_VERSION=1.17.7-1
sudo apt-get install -y \
  nvidia-container-toolkit=${NVIDIA_CONTAINER_TOOLKIT_VERSION} \
  nvidia-container-toolkit-base=${NVIDIA_CONTAINER_TOOLKIT_VERSION} \
  libnvidia-container-tools=${NVIDIA_CONTAINER_TOOLKIT_VERSION} \
  libnvidia-container1=${NVIDIA_CONTAINER_TOOLKIT_VERSION}

sudo nvidia-ctk runtime configure --runtime=docker

sudo systemctl restart docker
sudo docker run --rm --runtime=nvidia --gpus all nvidia/cuda:11.6.2-base-ubuntu20.04 nvidia-smi > ${NTC_NVSMI_OUTPUT_FILE}

## setup docker-compose
sudo curl -L https://github.com/docker/compose/releases/latest/download/docker-compose-$(uname -s)-$(uname -m) -o /usr/local/bin/docker-compose
sudo chmod +x /usr/local/bin/docker-compose
docker-compose version > ${DOCKER_COMPOSE_V}
This script installs all necessary packages, docker, docker-compose, and NVIDIA container toolkit for your convenience.
:::warning Check the OS compatibility
Make sure you selected Ubuntu 24.04 LTS as an Operating system, as the script is being tested and maintained against this operating system only. :::
With this configuration, you can finally Create the VM Instance and continue by setting up Firewall rules.
Firewall rules
Navigate from the Google Cloud dashboard to Compute Engine and find VM Instances.
Select the Set up firewall rules option.
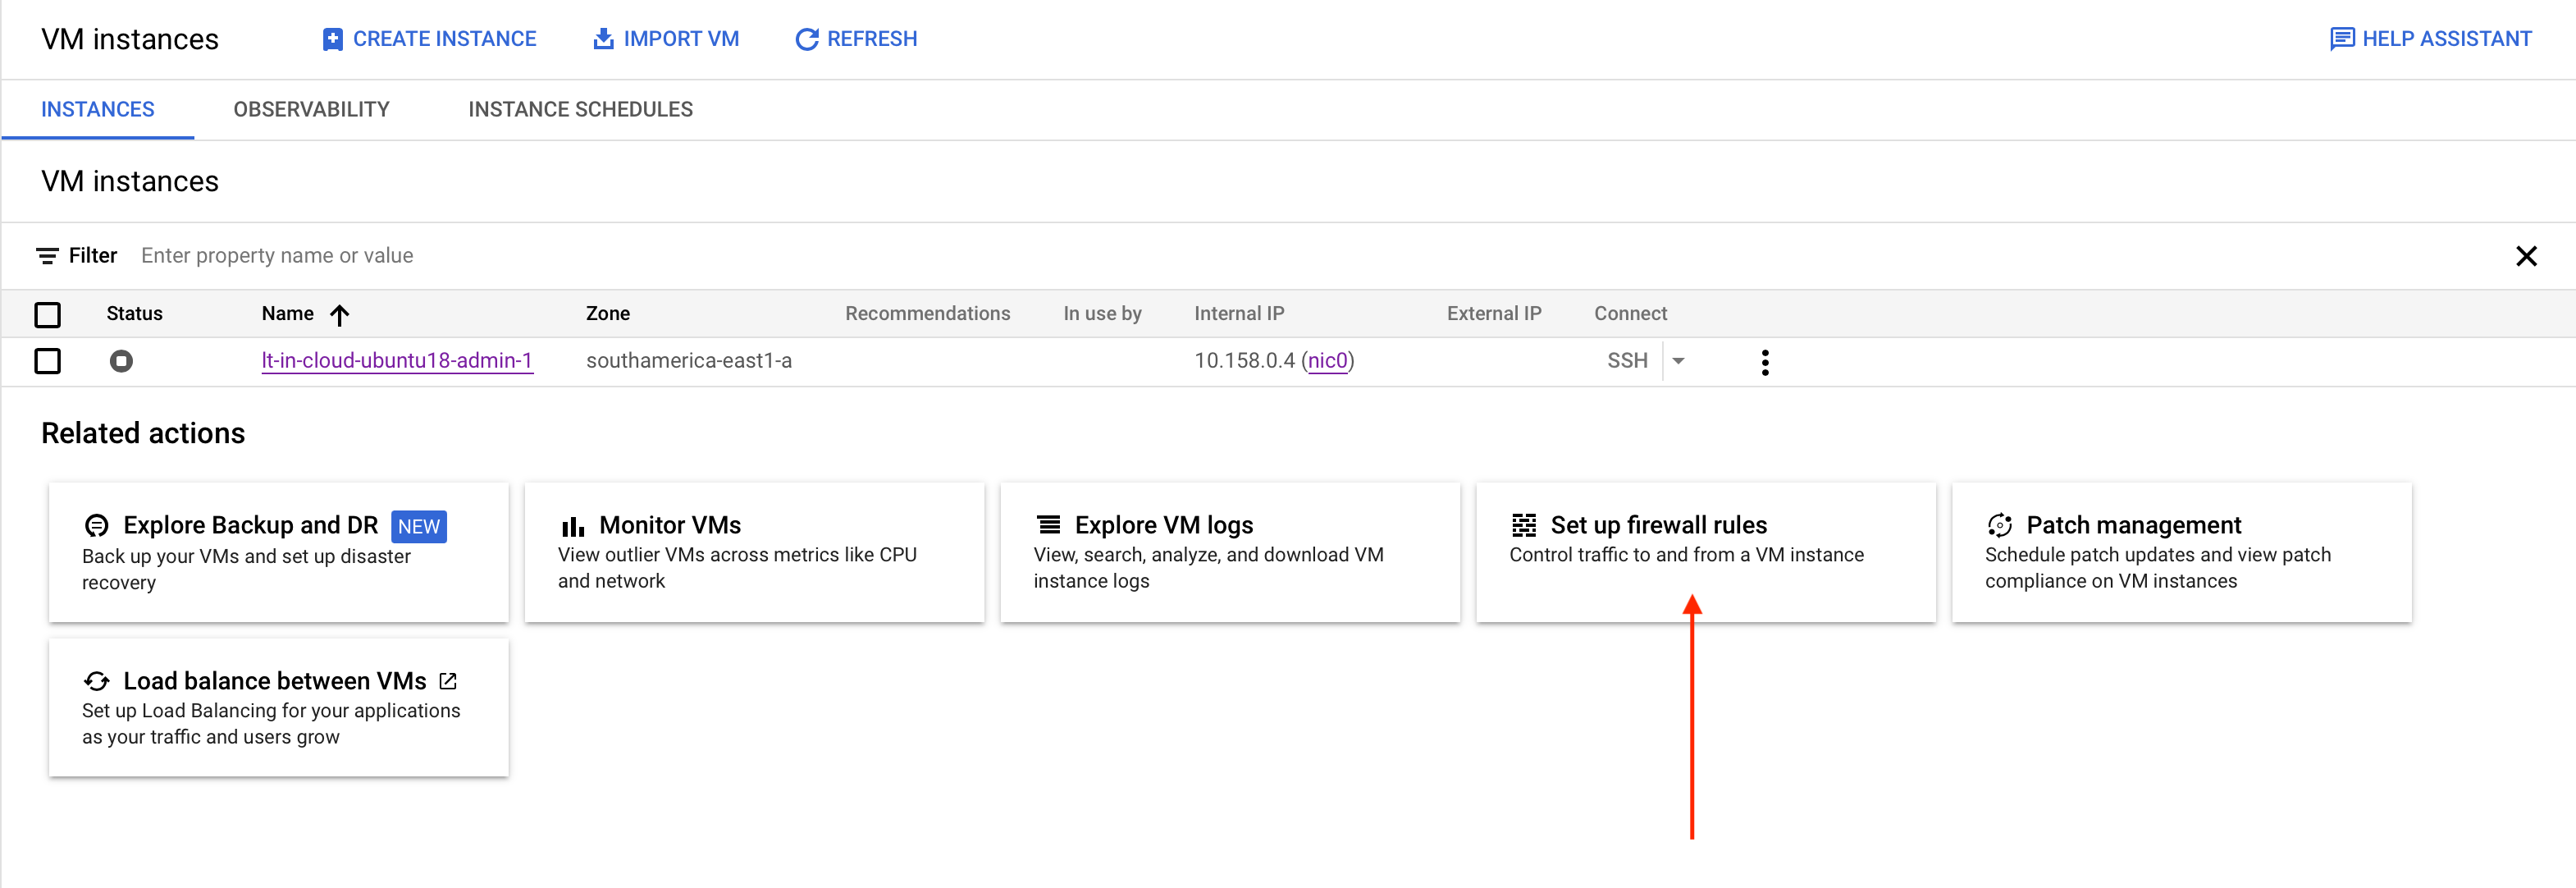
There is already a set of rules for your default network which allows you to freely send/receive data between the instances on this particular network.
To allow ingress and egress traffic with world, you have to click on Create firewall rule.
Next up:
- Type in the rule's Name
- (Optional) Associate the rule with a particular Network
- Select Direction of traffic
- Target tags to apply the rule only for certain VM instances in the network, or select All instances in the network from the drop-down menu
- Specify the Source/Destination IPv4 ranges, port range, and protocol
Note that you must specify these rules for ingress and egress traffic separately by creating 2 firewall rules.
:::note NDI, SRT and RTMP firewall rules
To allow a network traffic ingress or egress for these protocols, you have to enable traffic via specific TCP and UDP ports, e.g.:
- NDI - Allow TCP and UDP ports in range 5353-7999, as described in NDI documentation
- SRT (incl. RTP/UDP) - Allow specific range for UDP ports for your MPEG-TS streams in/out, e.g. port range 5000-6000
- RTMP - Allow TCP port 1935 :::
Prepare host OS
Before connecting to the VM, please wait a few minutes for the automated script to finish installing and configuring everything.
SSH to the host OS
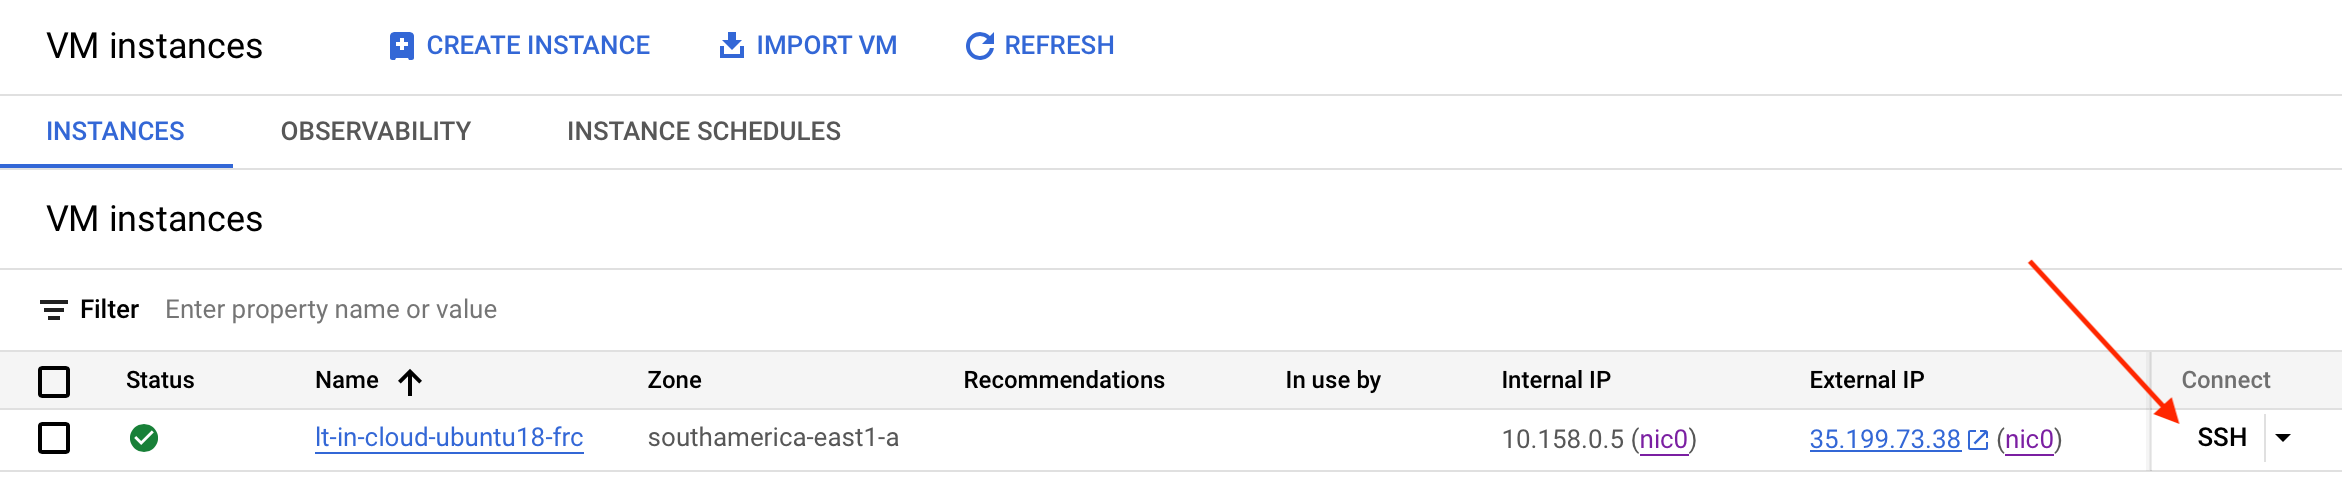
The easiest way to SSH to the host OS is to use a designated SSH web console by Google Cloud.
You can find it by navigating from the Google Cloud dashboard to Compute Engine and then to VM instances.
Use docker command without sudo
Allow running all docker commands as a non-root user by:
sudo groupadd docker
sudo usermod -aG docker $USER
newgrp docker
Enable coredumps
Enabling coredumps on your host instance helps us perform full diagnostics when an issue occurs.
sudo apt install systemd-coredump
Using NDI Discovery server
If you plan to utilize NDI Discovery server, you must disable or remove mDNS feature from your host instance first.
sudo apt-get remove avahi-daemon
High bitrate streaming
To be able to stream high bitrate codecs flawlessly, you need to adjust UDP kernel buffer size of your host instance first.
Configure cgroup settings
Edit the Configuration File /etc/docker/daemon.json and add or modify the cgroup-related settings
{
  "default-cgroupns-mode": "host"
}
If your daemon.json file already contains the runtimes configuration for NVIDIA, you can simply add additional configuration for cgroup settings without overwriting the existing content
{
    "runtimes": {
        "nvidia": {
            "args": [],
            "path": "nvidia-container-runtime"
        }
    },
    "default-cgroupns-mode": "host"
}
Save the file and restart the Docker daemon to apply the changes
sudo systemctl restart docker
:::tip All Done!
Your instance is fully prepared to run Live Transcoder in docker. :::
:::note Save the VM image for future
If you plan to spawn more instances or you'd like to avoid setting instances up again for any other reason, you can save the VM instance's image with Live Transcoder as a part of it.
If you'd like to save the environment with Live Transcoder, first, continue to Run Live Transcoder in docker section and then return here and proceed with the guide below. :::
Save the machine image
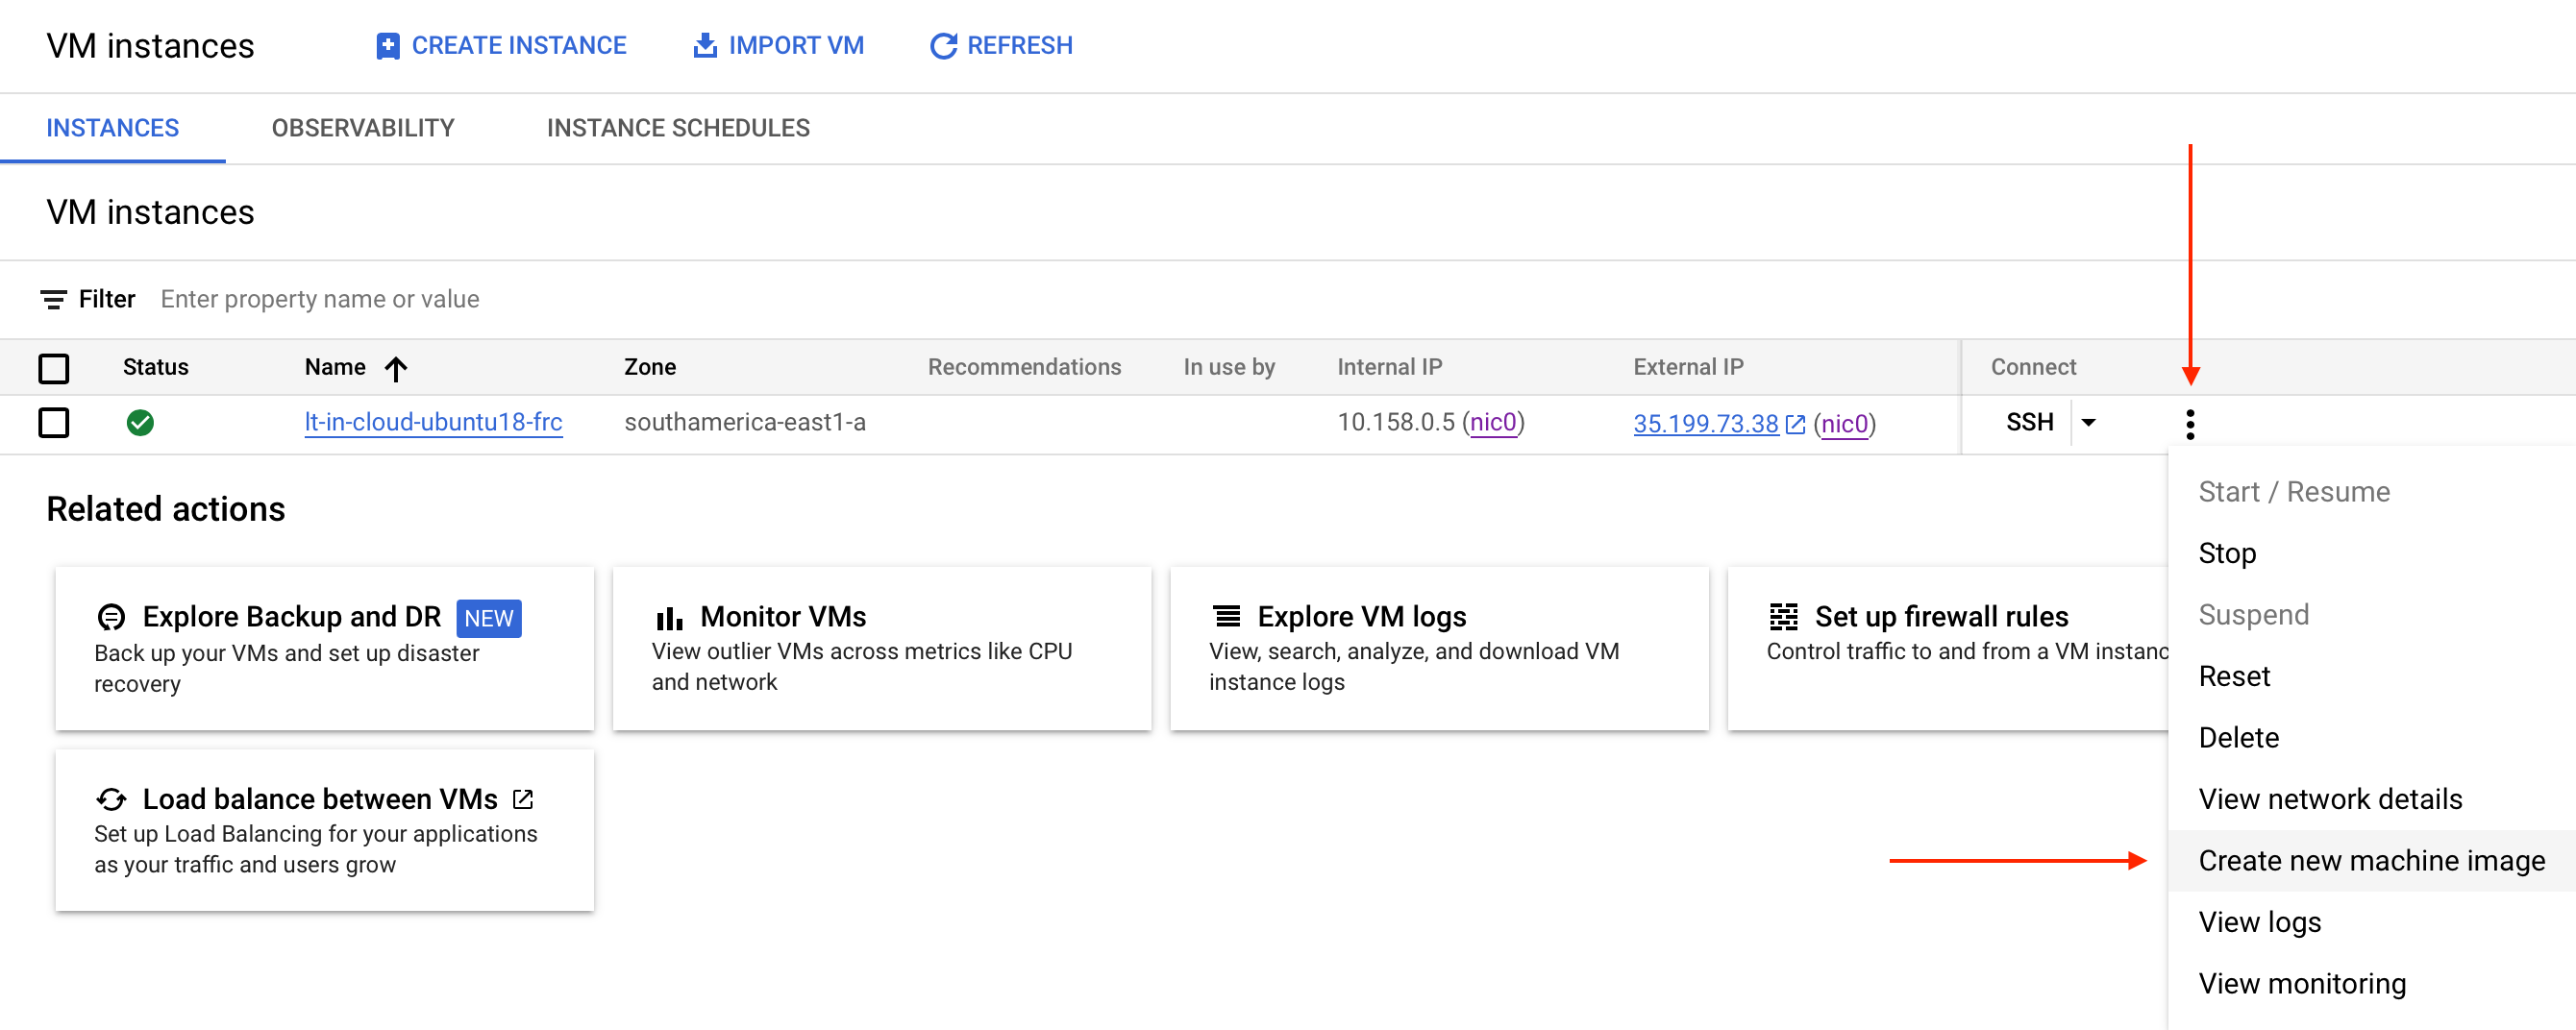
From the Google Cloud dashboard, navigate to Compute Engine and then to VM instances.
Select the three-dots menu on the left side of the VM instance and click on Create new machine image.
On the configuration page:
- Specify Name of your machine image
- Select whether the image should be bound to a particular Location
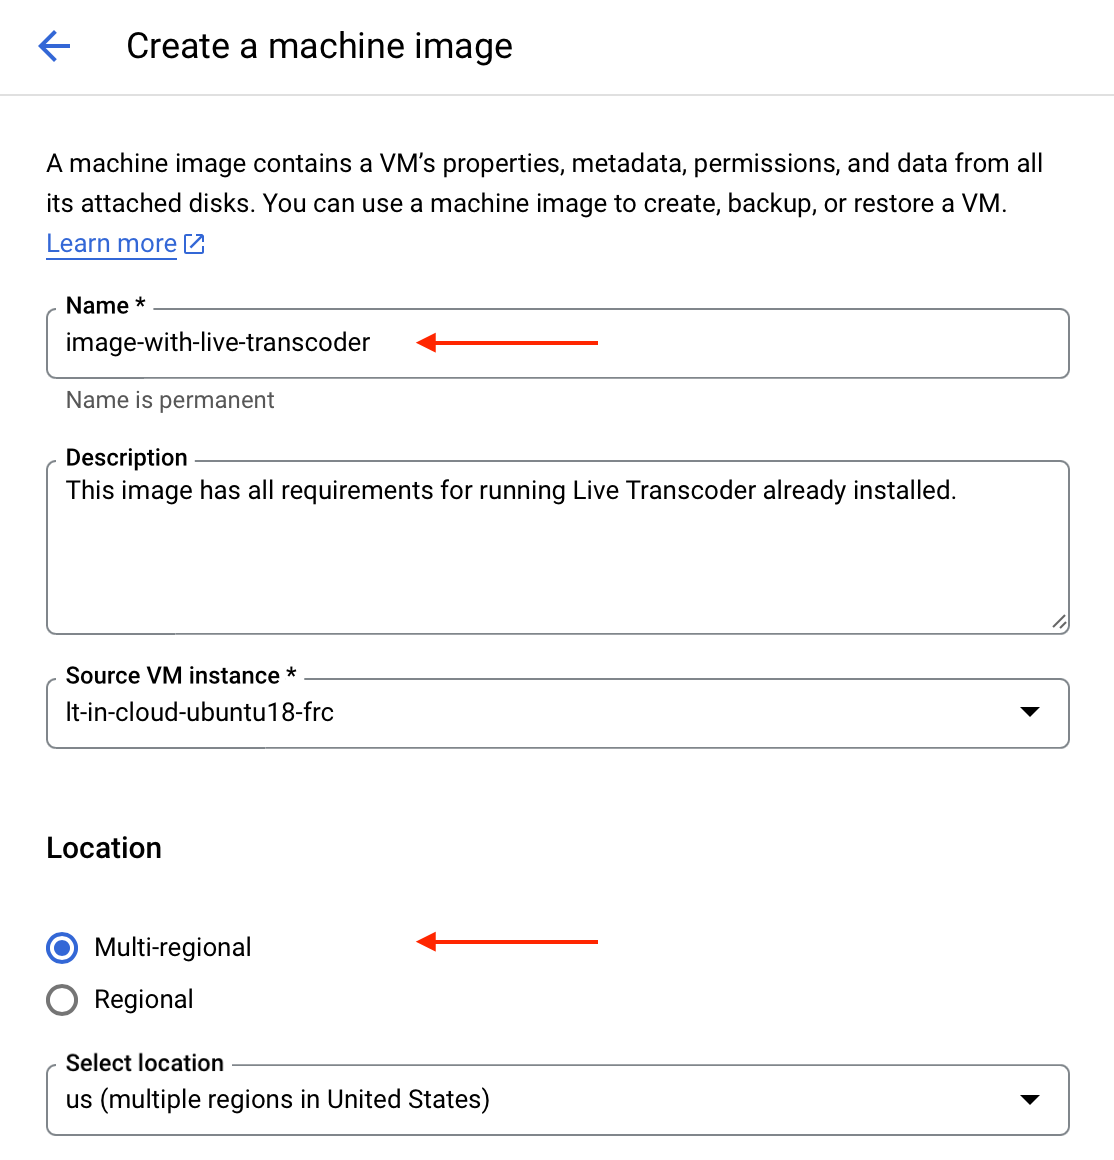
And finally, hit the Create button.
Creating an instance using a machine image
From the Google Cloud dashboard, navigate to Compute Engine and then to VM instances.
Click on Create instance button located at the top of the page.
Select the New VM instance from machine image option from the left panel.
Select the desired image and click on Continue.
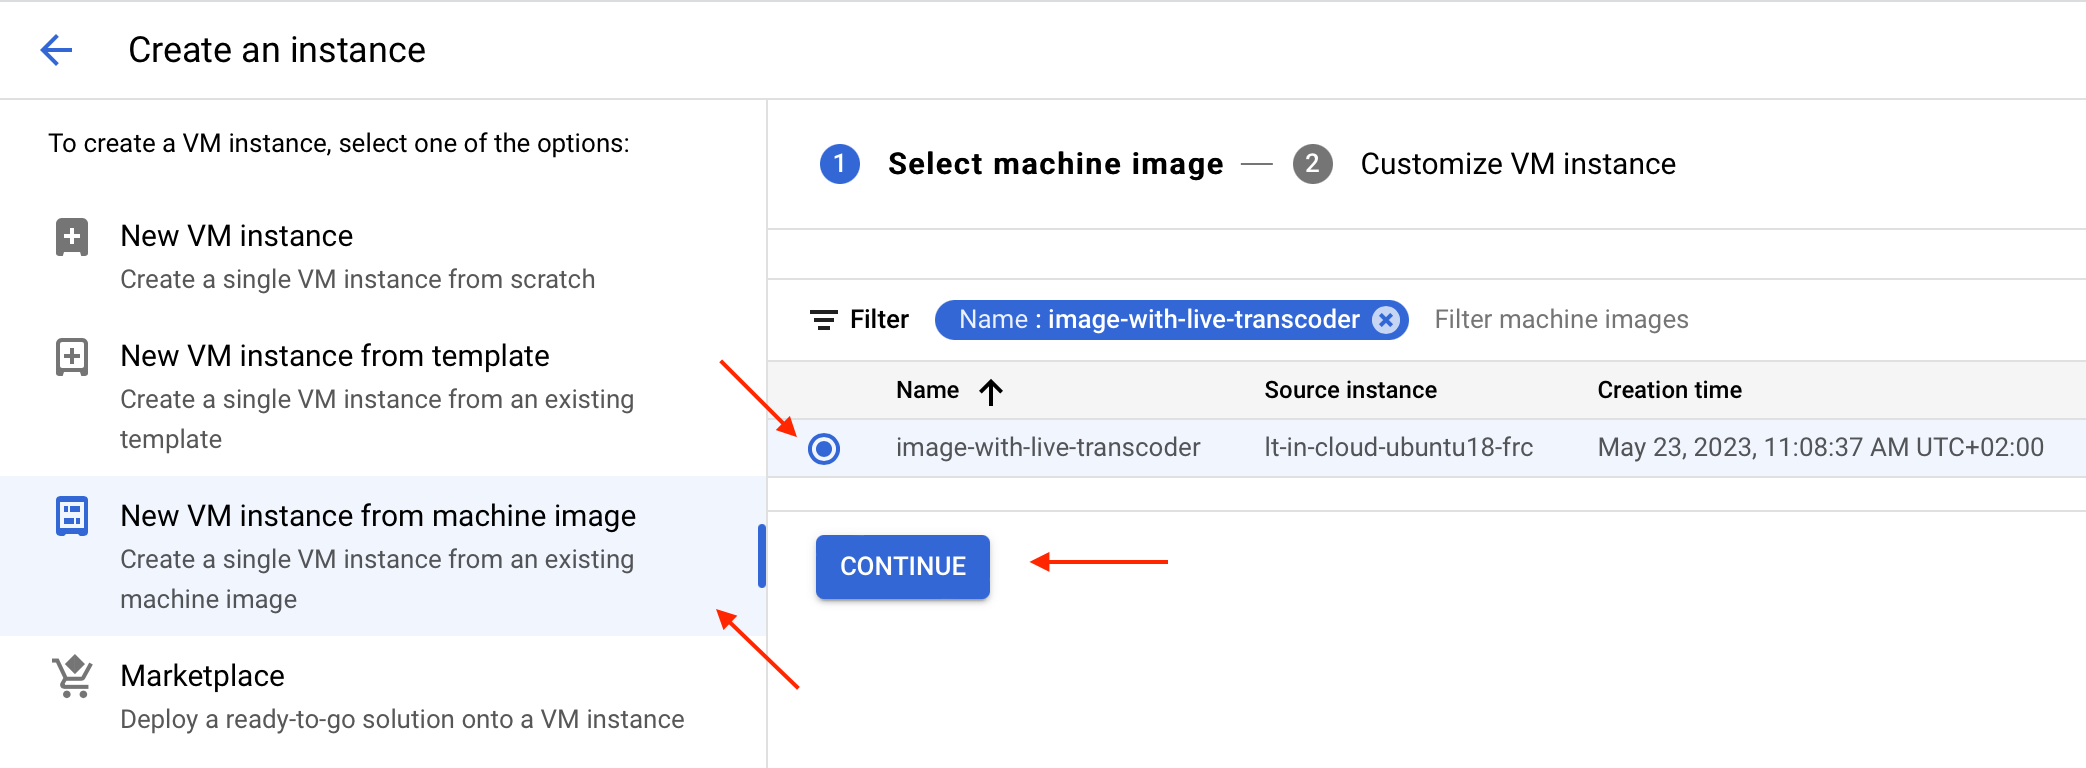
On the configuration page, you should:
- Specify a Name for your new instance
- Check the selected Region
- And make sure the instance type is switched to GPUs in Machine configuration section
All other parameters match those you used in the past when creating the VM the image is based on.
Proceed by hitting the Create button.
Increase max UDP kernel buffer size
Live Transcoder requires an increase to the UDP kernel buffer size:
SYSCTL_CONF="/etc/sysctl.d/10-udp-buffer-size.conf"
sudo sh -c "echo '#kernel send a receive windows buffer sizes' > $SYSCTL_CONF"
sudo sh -c "echo 'net.core.rmem_max=262144000' >> $SYSCTL_CONF"
sudo sh -c "echo 'net.core.wmem_max=262144000' >> $SYSCTL_CONF"
sudo sh -c "echo 'net.core.rmem_default=262144000' >> $SYSCTL_CONF"
sudo sh -c "echo 'net.core.wmem_default=262144000' >> $SYSCTL_CONF"
sudo sh -c "echo '' >> $SYSCTL_CONF"
Now load the updated config file:
sudo sysctl -p $SYSCTL_CONF
Increase txqueuelen for network interfaces
To stream out high-bitrate codecs (e.g., JPEG2000 or JPEG-XS), also txqueuelen parameter should be increased for the respective network interface(s). Below, we set the parameter for all available Ethernet network interfaces (by using KERNEL=="e*"):
sudo bash -c 'cat > /etc/udev/rules.d/80-txqueuelen.rules' << EOF
SUBSYSTEM=="net", ACTION=="add|change", KERNEL=="e*", ATTR{tx_queue_len}="10000"
EOF
To apply the changes immediately, run:
sudo udevadm control --reload-rules && sudo udevadm trigger